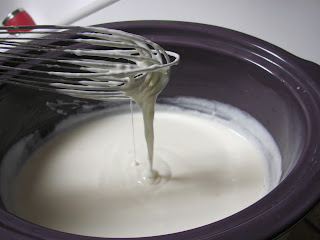
This is one of the first scratch recipes I tried. There are several variations so if it doesn't come out exactly like you like it keep trying. I have found that if you like a real thick yogurt such as "Greek Yogurt" then use that type as the starter and let it sit several hours longer. I then strain it through a thin cloth napkin or non terry dish towel. I place a colander into a bowl to catch the whey that will drain from the yogurt and refrigerate over night. Once the yogurt is at your desired thickness place into a bowl and mix fruit and sweetener as desired. If you like a standard thin yogurt then any yogurt will work fine.
Ingredients:
1/2 Gallon of whole milk (after you get the hang of it you can try your hand at 2% if you prefer)
1/2 cup of organic plain yogurt (with live cultures)
Fruit (optional)
Sugar or honey (optional)
Vanilla (optional)
Tools:
Crock-pot
Whisk
Heavy towel
Directions: Pour milk into crock pot, turn on low and cook for 2 1/2 hours.
After the 2 1/2 hours whisk the starter yogurt into the crock-pot and cover with lid and towel.
The towel helps insulate the crock-pot. Remember you will not be turning the crock-pot back on so the towel step is very important. In the cooler months I use two towels to ensure the crock-pot does not cool to quickly. Let the covered crock-pot sit 6-12 hours.
I know a lot of you are wondering how in the world the milk can set out that long without going bad! It is going bad, that's what makes it yogurt! Depending on how warm your house is and how thick you prefer your yogurt is how long you will let it set.
After six hours you may start checking the thickness. Once you have it like you want it, then you want to take the crock and place it in the fridge for several hours.
 |
| This was still a little to thin for Racey's taste so I let it continue to set for several more hours. |
You can eat the yogurt plain, sweetened, or with added fruit. Here are a few examples of the different fruits my family likes to add. All of these I got from the Farmers Market Baskets, here in Kennesaw, earlier in the spring or summer. I will do a post sometime soon on storing the harvest!
 | |
| We have Raspberries, Peaches, Cherries, and whole Strawberries. |
I like to put the fruit in the food processor and give it a whirl or two before adding it to my yogurt. If using frozen fruit I recommend to let it thaw a little before adding it to your food processor. It's a little easier on the blades! (Don't ask how I know this!)
- A few of things I have noticed when making this for my family that I might had considered as problems are:
- When I turn the heat off and start to whisk the starter into the soon to be yogurt, I want the temperature to be between 110-120 Fahrenheit. The reason for this is if you use a starter that has live active cultures in it the higher temperature will kill all the good bacteria in the starter. This will not cause the yogurt to flop it will just kill the good bacteria.
- Sometimes after the yogurt has set out for the 6-12 hours the top will be a light yellow color. In my opinion this is the fat in the milk rising to the top so I just whisk it before placing in the refrigerator, there again if whisked back into the yogurt it doesn't harm it.
- Don't forget to save 1/2-1 cup of your plain yogurt to be the started for the next batch.
Now that you know all the ins and outs of homemade yogurt its your turn to impress all your friends and family!


No comments:
Post a Comment